
Step by Step Guide Selling on Amazon

How to become an Amazon Seller
Ultimately, Signing up for an Amazon Seller Account is quite simple.
You can start signing up here, or by simply going to any page on Amazon and finding the link to become a seller.
To do this, head to Amazon and find the “Make money with us” option.
Underneath it will have a link to “Sell products on Amazon.”
From there, you’ll want to sign up for an Individual Seller Account.
Essentially, this allows you to sell your products without paying a monthly subscription (as opposed to the Pro Seller Account.)
Once you’ve started to make a decent income from selling on Amazon you can always upgrade.
Individual Amazon Seller Central Account Limitations (vs Pro)
- Can sell up to 40 products a month. More will require you to upgrade to a Pro Seller Account.
- You’re limited to specific categories. (Amazon will let you know when searching the UPC of your product in the Amazon Seller App)
- Gift wrap option for your customers isn’t available
- Listings are created manually in the Amazon Seller Central dashboard. (We will go over this shortly.)
- Bulk uploads aren’t supported.
After you’ve finished signing up on the website, download the app to your phone and sign in.
Now you’ll want to learn how to list your products.
Below, you’ll find an overview of how to do this.
How to manually list a product on Amazon
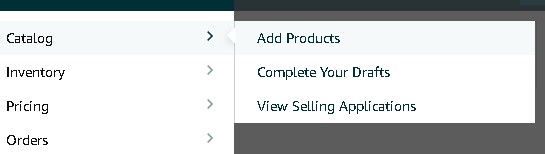
If your product is not already listed on Amazon, you’ll have to add products manually.
To do this, you’ll want to follow the steps under the Add products in the catalog section as shown below.
You will simply click on the Add products tab, and enter the information.
If you’re a beginner, it’s best to use an item that is already selling.
Furthermore, you can get used to adding new products after you’ve gotten a good feel of how it works.
If the product is already available on Amazon, you’ll first want to find the product in your Amazon Seller Central app.
You can do this by either searching it by it’s UPC by number, scanning its barcode if you already have it, or typing the product name in the search bar to find it manually.

Once you’ve found the product, you’ll see an option at the bottom that says “Sell” and click on it.
It will then ask you some questions.
The Seller SKU is optional, you can add something to this field if you want to.
Your price is going to be how much you’re selling the product for.
Essentially, a general rule of thumb is to sell just a tad lower than what others are selling it for.
However, this will likely change over time depending on demand.
Next, check “Amazon will ship and provide customer service (FBA aka Fulfilled by Amazon)”.
That way you won’t have to ship the items to the customers yourself (just to Amazon).
Once checked, click the Save and Finish button.
Typically, this usually only takes around 30 seconds.
Next, log into Amazon Seller Central on your computer.
Once in Seller Central on your computer, click the drop-down menu and hover over Inventory, and select “Manage FBA Inventory”.
This will bring you to your listing.
The next step is entering the information to get your shipping label.
To do this, go to the dropdown menu next to the edit button and select Send/Replenish Inventory.
If you’re sending in bulk items that you’ll be separating, you’ll want to check “labeling and prep required”.
Otherwise, keep this box unchecked and verify the number of units you’re sending.
Once you’ve finished this step, the “ready to pack” option will pop up. Click it, scroll down, and continue to packing your individual units.
Now check and see if your units will all fit into one box or if you’ll need multiple.
Check the option that is appropriate for you, and continue.
Amazon will now ask you for the dimensions and weight of the box and have you enter them in.
After completing this step, input the date on which you will be sending the products.
Amazon does have a preferred carrier recommendation that usually provides faster shipping.
However, you can choose the carrier most convenient for you.
At this point, if you have a Rollo printer your label may automatically print.
3 Best Printers for label printing
- 【High-Speed Printing】 150mm/s high-speed printing which can print 72 labels per minute, reducing unnecessary time wastage.Suitable for shipping labels and warehouse labels.
- 【Easy Installment】One minute to set up,Time Saver.Easy works with Windows and Mac operating systems.The Polono label printer is compatible with all major shipping and e-commerce platforms inlcuding FedEx, USPS, DHL, Amazon, Etsy, eBay, Shopify, etc. Please download the driver from the official website or USB Drive before printing.
- 【Automatic Label Detection】 With the intelligent paper return function,our Polono label printer can automatically catch and feed the label and supports label widths ranging from 2″(50mm)to 4.65″(118mm). This label printer can bring more convenience to your business.
- 【Go Green】The Polono label printer uses advanced direct thermal technology which no need any toner,ink or ribbon. All you need is thermal paper. Our label printer is durable and could be used for a long time. The customized print head can stably print 160,000 standard labels.
- One click set up on Windows and Mac
- Works with any Thermal Direct Label including free UPS labels – save hundreds of dollars on label costs – don’t fall victim to our competitor’s business model that forces you to buy their highly over-priced proprietary labels
- High Speed Printing at 150mm/s (one shipping label per second). Advanced Thermal Direct technology prints without requiring toner or ink.
- Compatible with Windows (XP and newer) and Mac (10.9 and newer) – Rollo offers 5-star U.S. based customer service via Phone, Email, and Remote-Desktop. Easy to setup with short how-to videos.
- High-speed label maker prints labels from 1.57″ to 4.1″ wide with no restriction on the height of the label, ideal for 4″ x 6″ shipping labels, warehouse labels, barcode and ID labels, bulk mailing labels and more
- This 4×6 barcode printer is compatible with Etsy, eBay, and Amazon
- 【High-Speed Printing】Supported by 5.9inches/s (150mm/s) high-speed printing technology, iDPRT SP410 label printer can print 72 sheets of 4×6 labels per minute, improving efficiency. Supporting the width of 2”(50mm)-4.25”(108mm) and the length of 1”(25mm)-11.81”(300mm), this shipping label printer is able to meet needs on various platforms including eBay, Amazon, and Shopify
- 【Economically friendly】 Advanced thermal direct technology enables this label printer to print without toner or ink. It’s high speed and easy to operate with it’s intelligent paper return function. Accurate and precise with no paper waste!
- 【Advanced and Convenient Design】 DPRT SP410 label printer is made from high quality durable materials. The built-in adapter makes this portable printer safer and easier to use.
- 【Compatible】 The shipping thermal label printer is compatible with Windows, Mac and Linux systems. Just download the driver from the official website or CD before printing and easily create your labels with the Free Bartender Label Editing Software provided.
Otherwise, if you’re using a regular printer, you’ll want to select the “letter” printing option on the screen.
Then print your label, tape it onto your box, and you’re ready to drop it off at a UPS location.

Next, head to Seller central and confirm your shipped items.
And that’s it!
After that, it’s all hands-off from there until you need to replenish your inventory.
Tips to increase your sales
When it comes to selling on Amazon, it can be somewhat competitive.
It’s important to know some of the ways to be able to market your product to lower your competition.
Improving your listing quality is one of those ways.
To do this, simply go back to the drop-down menu and again, hover over inventory. You’ll see an option that says “Improve Listing Quality”.
Next, you will answer some specifics about the items.
Typically, these will come in the form of multiple-choice or a drop-down menu.
You’ll mark the choices, and then click Save.
Your products will arrive at the warehouse and Amazon will change them to “active” and keep track of your inventory.
Getting Paid

Once someone buys your product, Amazon will let you know.
You’ll be able to see this when you log into your Amazon Seller Central App.
This will be on the right at the top of the dashboard.
However, Amazon will have to take out its fees before you get your payment amount.
Amazon pays out every 2 weeks. Your payment (current balance), as well as the payment date, will be available in Amazon Seller Central App.
It will typically take 4 days max to deposit into your bank account.
In addition to selling products, there are other ways of making money with them as well, including Affiliate Marketing, designing merchandise for Merch by Amazon, and Dropshipping.
Merch by Amazon allows you to sell apparel/merchandise on Amazon by creating your own designs on an app such as Canva or 99 Designs and uploading them onto the site.
Keep in mind that selling merchandise on Amazon has its requirements for approval, including having a website of your own. If you’re looking for sites that allow you to start selling right now, check out the “Digital Products” post.
Dropshipping is somewhat similar to Arbitrage, which is what we discussed in this post.
However, instead of you shipping the products, another company does that part for you and you essentially take care of the marketing.
There are several ways to drop ship, some with a website and some without. For more information on this topic check out our post “Dropshipping 101“